

들어가며
2023.08.25 - [Study/Spring boot] - [Spring boot] WebClient 사용해보기 2-1
이전글에서는 내가 어떻게 웹클라이언트를 사용하고 있는 지에 대해 간단하게 설명했다.
이번 글에서는 코드를 하나씩 보면서 내가 짠 코드가 어떻게 작동하는 지에 대해 설명해보고자 한다.
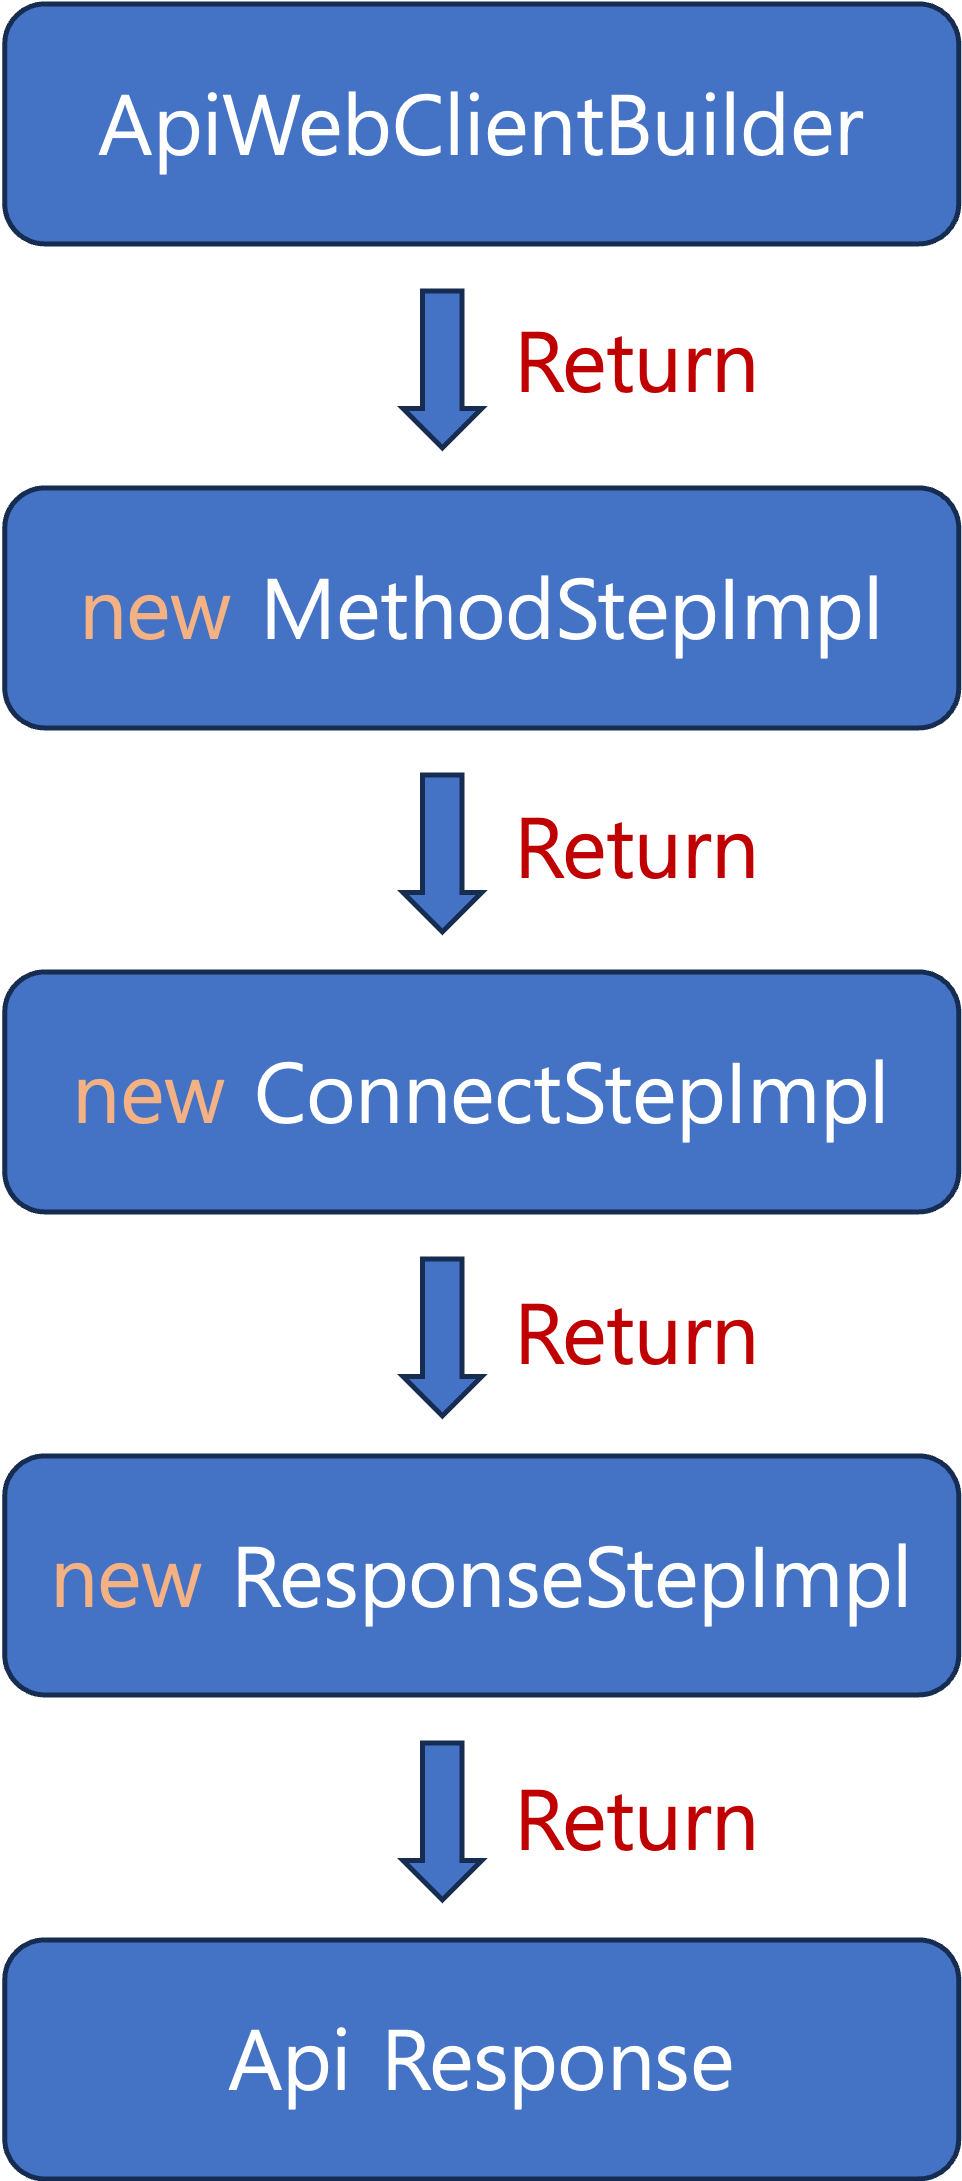
지난 글에서 위의 그림과 같이 메서드 체이닝 방식을 직접 구현했었다.
위의 그림 순서에 따라서 차근차근 코드를 보자.
ApiWebClientBuilder
@Component
@RequiredArgsConstructor
public class ApiWebClientBuilder {

    private final WebClient.Builder webClientBuilder;

    // 체이닝 시작점
    public <T> MethodStep<T> request() {
        return new MethodStepImpl<>(this.webClientBuilder);
    }
}
메서드 체이닝의 시작점이다.
일반적으로 WebClient를 Bean으로 등록할 때 WebClient 객체 자체를 등록해서 사용하는데, 여기서는 WebClient.Builder를 @Component어노테이션을 이용하여 Bean으로 등록한 후 이후 Build 과정을 동적으로 받을 수 있게 하였다.
이 클래스를 의존성 주입을 한 다음 request()메서드를 호출하게 되면 다음 순서인 MethodStepImpl객체를 리턴하게 된다.
request 메서드는 시작점이기 때문에 이 메서드가 호출되기 전에는 다음 과정을 수행할 수 없고, 다른 메서드를 먼저 호출하려고 하면 컴파일 에러가 뜨게 된다.
MethodStepImpl
@RequiredArgsConstructor
@Slf4j
public class MethodStepImpl<T> implements MethodStep<T> {

    private final WebClient.Builder webClientBuilder;
    private WebClient.RequestHeadersSpec<?> methodType;


    /**
     * WebClient의 baseUrl과 defaultHeader, encoding 설정
     *
     * @return {@link WebClient}
     */
    private WebClient setBase(String baseUrl) {
        // 인코딩 설정
        DefaultUriBuilderFactory factory = new DefaultUriBuilderFactory(baseUrl);
        factory.setEncodingMode(DefaultUriBuilderFactory.EncodingMode.VALUES_ONLY);

        // memory size 설정
        ExchangeStrategies exchangeStrategies = ExchangeStrategies.builder()
                .codecs(configurer -> configurer.defaultCodecs().maxInMemorySize(50 * 1024 * 1024)) // to unlimited memory size
                .build();

        // timeout 설정
        ReactorClientHttpConnector httpConnector = new ReactorClientHttpConnector(
                HttpClient.create()
                        .option(ChannelOption.CONNECT_TIMEOUT_MILLIS, 120000)
                        .responseTimeout(Duration.ofSeconds(120)));


        return this.webClientBuilder
                .exchangeStrategies(exchangeStrategies)
                .clientConnector(httpConnector)
                .uriBuilderFactory(factory)
                .defaultHeader(HttpHeaders.CONTENT_TYPE, MediaType.APPLICATION_JSON_VALUE)
                .baseUrl(baseUrl)
                .build();
    }

    /**
     * WebClient의 HttpMethod를 POST로 설정.<br>
     * Path 사용
     *
     * @return {@link ConnectStep}
     */
    @Override
    public ConnectStep post(String baseUrl, String path, T requestBody) {
        this.methodType = this.setBaseUrl(!StringUtils.hasText(baseUrl) ? "" : baseUrl)
                .post()
                .uri(uriBuilder -> uriBuilder
                        .path(path)
                        .build())
                .bodyValue(requestBody);
        return new ConnectStepImpl(this.methodType);
    }

    /**
     * WebClient의 HttpMethod를 POST로 설정.<br>
     * queryParam 사용
     *
     * @return {@link ConnectStep}
     */
    @Override
    public ConnectStep post(String baseUrl, MultiValueMap<String, String> params, T requestBody) {
        this.methodType = this.setBaseUrl(baseUrl)
                .post()
                .uri(uriBuilder -> uriBuilder
                        .queryParams(params)
                        .build())
                .bodyValue(requestBody);
        return new ConnectStepImpl(this.methodType);
    }

    /**
     * WebClient의 HttpMethod를 GET으로 설정.<br>
     *
     * @return {@link ConnectStep}
     */
    @Override
    public ConnectStep get(String baseUrl, MultiValueMap<String, String> params) {
        this.methodType = this.setBaseUrl(baseUrl)
                .get()
                .uri(uriBuilder -> uriBuilder
                        .queryParams(params == null || params.isEmpty() ? new LinkedMultiValueMap<>() : params)
                        .build());
        return new ConnectStepImpl(this.methodType);
    }
}
- MethodStep Interface
public interface MethodStep<T> {
    ConnectStep post(String baseUrl, String path, T requestBody);
    ConnectStep post(String baseUrl, MultiValueMap<String, String> params, T requestBody);
    ConnectStep get(String baseUrl, MultiValueMap<String, String> params);
}
MethodStep부터는 본격적으로 동적으로 값을 세팅하기 시작한다.
이 곳에서 baseUrl을 세팅하고, Api를 어떤 Http method로 호출할 것인지 선택하게 된다.
기본적으로 Interface를 상속받게 함으로써 기본적으로 사용하게 될 메서드 구현을 강제하게 만들었다.
각각의 메소드는 개발자에 따라 다르겠지만 우선 가장 많이 사용하는 post와 get를 몇가지 방식으로 구현해두었다.
메소드를 하나씩 보면서 따라가보자.
setBase()
private WebClient setBase(String baseUrl) {
        // 1. 인코딩 설정
        DefaultUriBuilderFactory factory = new DefaultUriBuilderFactory(baseUrl);
        factory.setEncodingMode(DefaultUriBuilderFactory.EncodingMode.VALUES_ONLY);

        // 2. memory size 설정
        ExchangeStrategies exchangeStrategies = ExchangeStrategies.builder()
                .codecs(configurer -> configurer.defaultCodecs().maxInMemorySize(50 * 1024 * 1024)) // to unlimited memory size
                .build();

        // 3. timeout 설정
        ReactorClientHttpConnector httpConnector = new ReactorClientHttpConnector(
                HttpClient.create()
                        .option(ChannelOption.CONNECT_TIMEOUT_MILLIS, 120000)
                        .responseTimeout(Duration.ofSeconds(120)));


        return this.webClientBuilder
                .exchangeStrategies(exchangeStrategies)
                .clientConnector(httpConnector)
                .uriBuilderFactory(factory)
                .defaultHeader(HttpHeaders.CONTENT_TYPE, MediaType.APPLICATION_JSON_VALUE)
                .baseUrl(baseUrl)
                .build();
    }
이 메소드에서는 baseUrl 세팅과 Api 호출에 필요한 여러가지 설정을 세팅한다.
각 설정을 동적으로 받지 않은 이유는, 프로젝트 구조상 굳이 뺄 필요가 없는 설정들이라고 판단했기 때문에 자칫해서 개발자가 놓칠 수도 있는 부분을 고려하지 않아도 될 수 있게 하기 위함이다.
각 설정을 살펴보자
- 인코딩 설정 : 다음글을 참고해서 인코딩 모드를 설정해주었다. 각 EncodingMode에 대한 설명은 링크에 설명되어있긴 하지만 간단하게 설명을 적어본다.
- TEMPLATE_AND_VALUES : URI의 문자열과 변수가 모두 인코딩된댜. 이때 URI Template(고정된 문자열들 ex. host, 변수명 등) 가 먼저 인코딩 되고 이후 변수가 특정 기준에 맞춰 인코딩된다.
- VALUES_ONLY : URI Template를 인코딩하지 않고 URI 변수만 인코딩한다.
- URI_COMPONENT : URI 변수가 대입된 후에 각 구성요소들을 인코딩한다. 이때 path에 허용된 예약어들은 인코딩하지 않는다.
- NONE : 인코딩을 적용하지 않는다.
- Memory size 설정 : 응답값의 최대 메모리 사이즈를 결정해주었다.
- Timeout 설정 : 현재 사용 중인 Api의 권장 timeout시간이 120초였기에 다음과 같이 설정했다.
tcpConfiguration()은 deprecated 되었으므로Option()을 사용하여 Connection timeout 설정을 해준다.
설정이 끝났다면 의존성 주입으로 받은 WebCliet.Builder 객체를 이용하여 본격적으로 WebClient 객체 빌드를 하고 이후 객체 사용을 위해서 리턴해준다.
post(), get()
/**
 * WebClient의 HttpMethod를 POST로 설정.<br>
 * Path 사용
 *
 * @return {@link ConnectStep}
 */
@Override
public ConnectStep post(String baseUrl, String path, T requestBody) {

    if (!StringUtils.hasText(baseUrl)) {
        throw new ApiException(ErrorCode.ETC_ERROR, "[WebClient] baseUrl은 비어있을 수 없습니다.");
    }

    this.methodType = this.setBaseUrl(baseUrl)
            .post()
            .uri(uriBuilder -> uriBuilder
                    .path(path)
                    .build())
            .bodyValue(requestBody);
    return new ConnectStepImpl(this.methodType);
}

/**
 * WebClient의 HttpMethod를 POST로 설정.<br>
 * queryParam 사용
 *
 * @return {@link ConnectStep}
 */
@Override
public ConnectStep post(String baseUrl, MultiValueMap<String, String> params, T requestBody) {
    if (!StringUtils.hasText(baseUrl)) {
        throw new ApiException(ErrorCode.ETC_ERROR, "[WebClient] baseUrl은 비어있을 수 없습니다.");
    }

    this.methodType = this.setBaseUrl(baseUrl)
            .post()
            .uri(uriBuilder -> uriBuilder
                    .queryParams(params)
                    .build())
            .bodyValue(requestBody);
    return new ConnectStepImpl(this.methodType);
}

/**
 * WebClient의 HttpMethod를 GET으로 설정.<br>
 *
 * @return {@link ConnectStep}
 */
@Override
public ConnectStep get(String baseUrl, MultiValueMap<String, String> params) {
    if (!StringUtils.hasText(baseUrl)) {
        throw new ApiException(ErrorCode.ETC_ERROR, "[WebClient] baseUrl은 비어있을 수 없습니다.");
    }

    this.methodType = this.setBaseUrl(baseUrl)
            .get()
            .uri(uriBuilder -> uriBuilder
                    .queryParams(params == null || params.isEmpty() ? new LinkedMultiValueMap<>() : params)
                    .build());
    return new ConnectStepImpl(this.methodType);
}
WebClient가 호출하게 될 HttpMethod를 선택하고, RequestBody 혹은 RequestParam을 설정하는 부분이다.
프로젝트 요구사항에서 POST나 GET 이외의 방식은 사용할 일이 없었기 때문에 두가지 메소드만 선언을 해두었지만, 개인의 요구사항에 맞게 세팅하면 된다.
WebClient의 각 메소드를 간단하게 설명해보면 다음과 같다.
- get(), post() : Http Method
- uri() : UriBuilder를 이용하여 호출하려는 uri의 scheme, host, path, param... 등등을 설정할 수 있다.
- bodyValue() : 객체 자체를 RequestBody로 담아 보낼 수 있다. WebFlux에서는 비동기 타입인 Mono나 Flux를 사용하지만 bodyValue를 사용하면 실제 값을 담을 수 있다.
Method 선택 및 RequestBody(Param)의 세팅이 끝났다면 다음 단계인 ConnectStepImpl을 return해주어 다음 체이닝 단계를 사용할 수 있게 해준다.
위의 코드처럼 호출 URL을 WebClient 객체를 build하기 전 baseUrl로 설정해주는 방식도 존재하지만, UriBuilder의 sheme(), host() 메소드를 사용해서 지정할 수도 있다. 하지만 이렇게 하게 되면 URL을 설정하는 코드가 중복되기 때문에 하나의 메소드로 분리하여 구현하였다.
UriBuilder를 사용하여 URL을 지정하는 방법은 아래와 같다.
this.setBaseUrl(baseUrl)
                .post()
                .uri(uriBuilder -> uriBuilder
                        .scheme("https")
                        .host("example.com")
                        .queryParams(params)
                        .build())
                .bodyValue(requestBody);
ConnectStepImpl
@Slf4j
@RequiredArgsConstructor
public class ConnectStepImpl implements ConnectStep {

    private final WebClient.RequestHeadersSpec<?> methodType;
    private Object response;


    /**
     * WebClient의 header와 response class 설정 후 block으로 호출<br>
     * 헤더와 응답값이 존재할 때 사용. (ex. 일반적인 api 호출)<br>
     * 예외처리 포함
     *
     * @return {@link ResponseStep}
     */
    @Override
    public ResponseStep connectBlock(Map<String, String> headers, Class<?> responseType) {
        try {
            this.response = this.methodType
                    .headers(httpHeaders -> {
                        httpHeaders.setAll(headers == null || headers.isEmpty() ? new HashMap<>() : headers);
                    })
                    .retrieve()
                    .onStatus(HttpStatus::isError, clientResponse ->
                            clientResponse.bodyToMono(String.class)
                                    .flatMap(msg -> Mono.error(new APIException(ResponseCode.INTERFACE_ERROR, msg))))
                    .bodyToMono(responseType)
                    .retryWhen(Retry.fixedDelay(3, java.time.Duration.ofSeconds(1))
                            .doBeforeRetry(before -> log.info("Retry: {} | {}", before.totalRetries(), before.failure())))
                    .block();
            return new ResponseStepImpl(this.response);
        } catch (Exception e) {
            log.error("Exception : {}", e.getMessage());
            throw new ApiException(ErrorCode.INTERFACE_ERROR, e.getMessage());
        }
    }


    @Override
    public ResponseStep connectBlock(Map<String, String> headers) {
        try {
            this.response = this.methodType
                    .headers(httpHeaders -> {
                        httpHeaders.setAll(headers == null || headers.isEmpty() ? new HashMap<>() : headers);
                    })
                    .retrieve()
                    .onStatus(HttpStatus::isError, clientResponse ->
                            clientResponse.bodyToMono(String.class)
                                    .flatMap(msg -> Mono.error(new APIException(ResponseCode.INTERFACE_ERROR, msg))))
                    .bodyToMono(Object.class)
                    .retryWhen(Retry.fixedDelay(3, java.time.Duration.ofSeconds(1))
                            .doBeforeRetry(before -> log.info("Retry: {} | {}", before.totalRetries(), before.failure())))
                    .block();
            return new ResponseStepImpl(this.response);
        } catch (Exception e) {
            log.error("Exception : {} | {}", e.getMessage(), e.getStackTrace()[0].toString());
            throw new ApiException(ErrorCode.INTERFACE_ERROR, e.getMessage());
        }
    }


    /**
     * WebClient의 header와 response class 설정 후 block으로 호출<br>
     * 헤더와 응답값이 존재하지 않을 때 사용. (ex. Google chat webhook api 호출)<br>
     * 예외처리 포함
     *
     * @return {@link ResponseStep}
     */
    @Override
    public ResponseStep connectBlock() {
        try {
            this.response = this.methodType
                    .retrieve()
                    .onStatus(HttpStatus::isError, clientResponse ->
                            clientResponse.bodyToMono(String.class)
                                    .flatMap(msg -> Mono.error(new APIException(ResponseCode.INTERFACE_ERROR, msg))))
                    .bodyToMono(Object.class)
                    .retryWhen(Retry.fixedDelay(3, java.time.Duration.ofSeconds(1))
                            .doBeforeRetry(before -> log.info("Retry: {} | {}", before.totalRetries(), before.failure())))
                    .block();
            return new ResponseStepImpl(this.response);
        } catch (Exception e) {
            log.error("Exception : {} | {}", e.getMessage(), e.getStackTrace()[0].toString());
            throw new ApiException(ErrorCode.INTERFACE_ERROR, e.getMessage());
        }
    }
}
ConnectStep은 본격적으로 API를 URL로 호출하여 응답을 받는 부분이다.
이번에도 각 메소드를 하나씩 살펴보자
- retrieve() : WebClient에서 응답을 받는 방식은
exchange()와retrieve()두가지가 있다.exchange()는 deprecated되었으므로 만약 exchange를 사용하고 싶다면exchangeToMono()나exchangeToFlux()를 사용하자. - onStatue() : 상태코드를 캐치한다. 특정 상태코드 (404, 500 등등)나 4xx, 5xx 등 세분화하여 응답을 받을 수 있다.
- 여기서는
isError를 사용하여 모든 에러를 캐치하여 Exception을 throw할 수 있도록 구현하였다.
- 여기서는
- bodyToMono() : ResponseBody를 원하는 객체로 변환한다. Mono 타입이므로 0 ~ 1개의 응답만 받을 수 있다.
- 만약 2개 이상의 응답을 받고 싶다면
bodyToFlux()를, ResponseEntity를 받고 싶다면toEntity()를 사용할 수 있다.
- 만약 2개 이상의 응답을 받고 싶다면
- retryWhen() : 에러가 발생했을 경우 재시도 한다. Retry 객체로 재시도 횟수와 대기 시간, 재시도하기 전에 수행할 동작을 정의할 수 있다.
- block() : 응답을 동기 방식으로 받는다. block를 사용하면 비동기 타입인 Mono<Object>가 아닌 Object 객체를 가져올 수 있지만 WebClient의 장점인 비동기 방식이 아닌 동기 방식을 사용한다는 부분에 유의하자.
- 내 경우에는 비동기 통신을 이용할 일이 없기 때문에 모든 메소드를
block()을 사용하여 동기 방식을 사용하였다. 이 역시 개인의 요구사항에 맞춰 사용하자.
- 내 경우에는 비동기 통신을 이용할 일이 없기 때문에 모든 메소드를
코드를 살펴보면 오버로딩을 통해 여러가지 파라미터를 받는 걸 확인할 수 있다. 이는, 요청으로 header가 필요한 경우, 특정 응답 객체로 받는 경우, 아무 응답도 받지 않는 경우를 모두 구현해 놓았기 때문이다.
이렇게 API 호출 및 응답을 받는 과정을 마치면 최종적으로 객체를 원하는 형태로 만드는 ResponseStepImpl을 리턴하여 최종 단계로 넘어갈 수 있다.
ResponseStepImpl
@Slf4j
@RequiredArgsConstructor
public class ResponseStepImpl implements ResponseStep {

    private final Object response;

    /**
     * WebClient의 response를 Object로 리턴<br>
     * 응답값을 response type class로 파싱 후 사용<br>
     * <br>
     * Example)<br>
     * TestDto test = (TestDto) webClientConnectorTest.post(url, path, requestBody)
     *                 .connectBlock(headers, TestDto.class)
     *                 .toObjectCall();
     * @return {@link Object}
     */
    @Override
    public Object toObjectCall() {
        return this.response;
    }

    /**
     * WebClient의 response를 JsonNode로 파싱하여 리턴
     * @return {@link JsonNode}
     */
    @Override
    public JsonNode toJsonNodeCall() {
        try {
            ObjectMapper om = new ObjectMapper();

            return om.readTree(this.response.toString());
        } catch (JsonProcessingException e) {
            log.error("JsonProcessingException : {}", e.getMessage());
            throw new ApiException(ErrorCode.INTERFACE_ERROR, e.getMessage());
        }
    }

    /**
     * WebClient의 response를 리턴하지 않음
     */
    @Override
    public void toVoidCall() {}
}
마지막 step은 간단하다. 어떤 형태의 객체를 return할 지를 결정하는 부분이다.
사실 toJsonNodeCall()은 굳이 필요하지 않지만 팀원의 요청으로 넣어두었기 때문에 무시해도 된다.
크게 설명할 부분이 없으므로 이 부분은 코드만 보여주고 넘어가도록 하겠다.
Result
이 모든 과정을 마치면 이전 글에서 작성한 것처럼 아래와 같이 코드를 사용할 수 있다.
public Object callApi(String baseUrl, String path, T request, Class<?> response) {
    return apiWebClientBuilder.request()
            .post(baseUrl, path, request)
            .connectBlock(this.getHeader(), response)
            .toObjectCall();
}

public ExampleResponseDto exampleCallApi(ExampleRequestDto request) {
	String baseUrl = "https://example.com";
    String path = "/api/test";

    return (ExampleResponseDto) this.callApi(baseUrl, path, request, ExampleResponseDto.class);
}
최종 코드는 아래 Github 링크에서 확인할 수 있다
https://github.com/Anna-Jin/spring-boot
GitHub - Anna-Jin/spring-boot: spring boot 코드 정리 및 공부용 레파지토리
spring boot 코드 정리 및 공부용 레파지토리. Contribute to Anna-Jin/spring-boot development by creating an account on GitHub.
github.com
마치며
어떻게 WebClient를 더 쉽게 라이브러리처럼 bean등록하여 사용할 수 있을까 고심하여 코드를 짜보았다.
긴 내용이지만 WebClient에 대한 약간의 이해가 있는 상태에서 차근차근 따라가면 크게 어려울 것 없는 코드라고 생각한다.
아직 초보 개발자로서 완벽한 코드라고 말하기는 어렵지만, 계속 코드를 업데이트하면서 더 완벽하게 만들어 모듈화시킬 예정이다!
'Spring boot' 카테고리의 다른 글
| [Spring boot] WebClient 사용해보기 - 비동기 통신 subscribe() (0) | 2023.11.11 |
|---|---|
| [Spring boot] SSH 터널링 구현하기 (0) | 2023.10.13 |
| [Spring boot] WebClient 사용해보기 - 모듈화 1-1 (0) | 2023.08.25 |
| [JPA] 프록시(Proxy), 지연 로딩(LAZY Loading), 즉시 로딩(EAGER Loading) (0) | 2022.06.23 |
| [JPA] 영속성 관리 (0) | 2022.06.21 |
들어가며
2023.08.25 - [Study/Spring boot] - [Spring boot] WebClient 사용해보기 2-1
이전글에서는 내가 어떻게 웹클라이언트를 사용하고 있는 지에 대해 간단하게 설명했다.
이번 글에서는 코드를 하나씩 보면서 내가 짠 코드가 어떻게 작동하는 지에 대해 설명해보고자 한다.
지난 글에서 위의 그림과 같이 메서드 체이닝 방식을 직접 구현했었다.
위의 그림 순서에 따라서 차근차근 코드를 보자.
ApiWebClientBuilder
@Component
@RequiredArgsConstructor
public class ApiWebClientBuilder {

    private final WebClient.Builder webClientBuilder;

    // 체이닝 시작점
    public <T> MethodStep<T> request() {
        return new MethodStepImpl<>(this.webClientBuilder);
    }
}
메서드 체이닝의 시작점이다.
일반적으로 WebClient를 Bean으로 등록할 때 WebClient 객체 자체를 등록해서 사용하는데, 여기서는 WebClient.Builder를 @Component어노테이션을 이용하여 Bean으로 등록한 후 이후 Build 과정을 동적으로 받을 수 있게 하였다.
이 클래스를 의존성 주입을 한 다음 request()메서드를 호출하게 되면 다음 순서인 MethodStepImpl객체를 리턴하게 된다.
request 메서드는 시작점이기 때문에 이 메서드가 호출되기 전에는 다음 과정을 수행할 수 없고, 다른 메서드를 먼저 호출하려고 하면 컴파일 에러가 뜨게 된다.
MethodStepImpl
@RequiredArgsConstructor
@Slf4j
public class MethodStepImpl<T> implements MethodStep<T> {

    private final WebClient.Builder webClientBuilder;
    private WebClient.RequestHeadersSpec<?> methodType;


    /**
     * WebClient의 baseUrl과 defaultHeader, encoding 설정
     *
     * @return {@link WebClient}
     */
    private WebClient setBase(String baseUrl) {
        // 인코딩 설정
        DefaultUriBuilderFactory factory = new DefaultUriBuilderFactory(baseUrl);
        factory.setEncodingMode(DefaultUriBuilderFactory.EncodingMode.VALUES_ONLY);

        // memory size 설정
        ExchangeStrategies exchangeStrategies = ExchangeStrategies.builder()
                .codecs(configurer -> configurer.defaultCodecs().maxInMemorySize(50 * 1024 * 1024)) // to unlimited memory size
                .build();

        // timeout 설정
        ReactorClientHttpConnector httpConnector = new ReactorClientHttpConnector(
                HttpClient.create()
                        .option(ChannelOption.CONNECT_TIMEOUT_MILLIS, 120000)
                        .responseTimeout(Duration.ofSeconds(120)));


        return this.webClientBuilder
                .exchangeStrategies(exchangeStrategies)
                .clientConnector(httpConnector)
                .uriBuilderFactory(factory)
                .defaultHeader(HttpHeaders.CONTENT_TYPE, MediaType.APPLICATION_JSON_VALUE)
                .baseUrl(baseUrl)
                .build();
    }

    /**
     * WebClient의 HttpMethod를 POST로 설정.<br>
     * Path 사용
     *
     * @return {@link ConnectStep}
     */
    @Override
    public ConnectStep post(String baseUrl, String path, T requestBody) {
        this.methodType = this.setBaseUrl(!StringUtils.hasText(baseUrl) ? "" : baseUrl)
                .post()
                .uri(uriBuilder -> uriBuilder
                        .path(path)
                        .build())
                .bodyValue(requestBody);
        return new ConnectStepImpl(this.methodType);
    }

    /**
     * WebClient의 HttpMethod를 POST로 설정.<br>
     * queryParam 사용
     *
     * @return {@link ConnectStep}
     */
    @Override
    public ConnectStep post(String baseUrl, MultiValueMap<String, String> params, T requestBody) {
        this.methodType = this.setBaseUrl(baseUrl)
                .post()
                .uri(uriBuilder -> uriBuilder
                        .queryParams(params)
                        .build())
                .bodyValue(requestBody);
        return new ConnectStepImpl(this.methodType);
    }

    /**
     * WebClient의 HttpMethod를 GET으로 설정.<br>
     *
     * @return {@link ConnectStep}
     */
    @Override
    public ConnectStep get(String baseUrl, MultiValueMap<String, String> params) {
        this.methodType = this.setBaseUrl(baseUrl)
                .get()
                .uri(uriBuilder -> uriBuilder
                        .queryParams(params == null || params.isEmpty() ? new LinkedMultiValueMap<>() : params)
                        .build());
        return new ConnectStepImpl(this.methodType);
    }
}
- MethodStep Interface
public interface MethodStep<T> {
    ConnectStep post(String baseUrl, String path, T requestBody);
    ConnectStep post(String baseUrl, MultiValueMap<String, String> params, T requestBody);
    ConnectStep get(String baseUrl, MultiValueMap<String, String> params);
}
MethodStep부터는 본격적으로 동적으로 값을 세팅하기 시작한다.
이 곳에서 baseUrl을 세팅하고, Api를 어떤 Http method로 호출할 것인지 선택하게 된다.
기본적으로 Interface를 상속받게 함으로써 기본적으로 사용하게 될 메서드 구현을 강제하게 만들었다.
각각의 메소드는 개발자에 따라 다르겠지만 우선 가장 많이 사용하는 post와 get를 몇가지 방식으로 구현해두었다.
메소드를 하나씩 보면서 따라가보자.
setBase()
private WebClient setBase(String baseUrl) {
        // 1. 인코딩 설정
        DefaultUriBuilderFactory factory = new DefaultUriBuilderFactory(baseUrl);
        factory.setEncodingMode(DefaultUriBuilderFactory.EncodingMode.VALUES_ONLY);

        // 2. memory size 설정
        ExchangeStrategies exchangeStrategies = ExchangeStrategies.builder()
                .codecs(configurer -> configurer.defaultCodecs().maxInMemorySize(50 * 1024 * 1024)) // to unlimited memory size
                .build();

        // 3. timeout 설정
        ReactorClientHttpConnector httpConnector = new ReactorClientHttpConnector(
                HttpClient.create()
                        .option(ChannelOption.CONNECT_TIMEOUT_MILLIS, 120000)
                        .responseTimeout(Duration.ofSeconds(120)));


        return this.webClientBuilder
                .exchangeStrategies(exchangeStrategies)
                .clientConnector(httpConnector)
                .uriBuilderFactory(factory)
                .defaultHeader(HttpHeaders.CONTENT_TYPE, MediaType.APPLICATION_JSON_VALUE)
                .baseUrl(baseUrl)
                .build();
    }
이 메소드에서는 baseUrl 세팅과 Api 호출에 필요한 여러가지 설정을 세팅한다.
각 설정을 동적으로 받지 않은 이유는, 프로젝트 구조상 굳이 뺄 필요가 없는 설정들이라고 판단했기 때문에 자칫해서 개발자가 놓칠 수도 있는 부분을 고려하지 않아도 될 수 있게 하기 위함이다.
각 설정을 살펴보자
- 인코딩 설정 : 다음글을 참고해서 인코딩 모드를 설정해주었다. 각 EncodingMode에 대한 설명은 링크에 설명되어있긴 하지만 간단하게 설명을 적어본다.
- TEMPLATE_AND_VALUES : URI의 문자열과 변수가 모두 인코딩된댜. 이때 URI Template(고정된 문자열들 ex. host, 변수명 등) 가 먼저 인코딩 되고 이후 변수가 특정 기준에 맞춰 인코딩된다.
- VALUES_ONLY : URI Template를 인코딩하지 않고 URI 변수만 인코딩한다.
- URI_COMPONENT : URI 변수가 대입된 후에 각 구성요소들을 인코딩한다. 이때 path에 허용된 예약어들은 인코딩하지 않는다.
- NONE : 인코딩을 적용하지 않는다.
- Memory size 설정 : 응답값의 최대 메모리 사이즈를 결정해주었다.
- Timeout 설정 : 현재 사용 중인 Api의 권장 timeout시간이 120초였기에 다음과 같이 설정했다.
tcpConfiguration()은 deprecated 되었으므로Option()을 사용하여 Connection timeout 설정을 해준다.
설정이 끝났다면 의존성 주입으로 받은 WebCliet.Builder 객체를 이용하여 본격적으로 WebClient 객체 빌드를 하고 이후 객체 사용을 위해서 리턴해준다.
post(), get()
/**
 * WebClient의 HttpMethod를 POST로 설정.<br>
 * Path 사용
 *
 * @return {@link ConnectStep}
 */
@Override
public ConnectStep post(String baseUrl, String path, T requestBody) {

    if (!StringUtils.hasText(baseUrl)) {
        throw new ApiException(ErrorCode.ETC_ERROR, "[WebClient] baseUrl은 비어있을 수 없습니다.");
    }

    this.methodType = this.setBaseUrl(baseUrl)
            .post()
            .uri(uriBuilder -> uriBuilder
                    .path(path)
                    .build())
            .bodyValue(requestBody);
    return new ConnectStepImpl(this.methodType);
}

/**
 * WebClient의 HttpMethod를 POST로 설정.<br>
 * queryParam 사용
 *
 * @return {@link ConnectStep}
 */
@Override
public ConnectStep post(String baseUrl, MultiValueMap<String, String> params, T requestBody) {
    if (!StringUtils.hasText(baseUrl)) {
        throw new ApiException(ErrorCode.ETC_ERROR, "[WebClient] baseUrl은 비어있을 수 없습니다.");
    }

    this.methodType = this.setBaseUrl(baseUrl)
            .post()
            .uri(uriBuilder -> uriBuilder
                    .queryParams(params)
                    .build())
            .bodyValue(requestBody);
    return new ConnectStepImpl(this.methodType);
}

/**
 * WebClient의 HttpMethod를 GET으로 설정.<br>
 *
 * @return {@link ConnectStep}
 */
@Override
public ConnectStep get(String baseUrl, MultiValueMap<String, String> params) {
    if (!StringUtils.hasText(baseUrl)) {
        throw new ApiException(ErrorCode.ETC_ERROR, "[WebClient] baseUrl은 비어있을 수 없습니다.");
    }

    this.methodType = this.setBaseUrl(baseUrl)
            .get()
            .uri(uriBuilder -> uriBuilder
                    .queryParams(params == null || params.isEmpty() ? new LinkedMultiValueMap<>() : params)
                    .build());
    return new ConnectStepImpl(this.methodType);
}
WebClient가 호출하게 될 HttpMethod를 선택하고, RequestBody 혹은 RequestParam을 설정하는 부분이다.
프로젝트 요구사항에서 POST나 GET 이외의 방식은 사용할 일이 없었기 때문에 두가지 메소드만 선언을 해두었지만, 개인의 요구사항에 맞게 세팅하면 된다.
WebClient의 각 메소드를 간단하게 설명해보면 다음과 같다.
- get(), post() : Http Method
- uri() : UriBuilder를 이용하여 호출하려는 uri의 scheme, host, path, param... 등등을 설정할 수 있다.
- bodyValue() : 객체 자체를 RequestBody로 담아 보낼 수 있다. WebFlux에서는 비동기 타입인 Mono나 Flux를 사용하지만 bodyValue를 사용하면 실제 값을 담을 수 있다.
Method 선택 및 RequestBody(Param)의 세팅이 끝났다면 다음 단계인 ConnectStepImpl을 return해주어 다음 체이닝 단계를 사용할 수 있게 해준다.
위의 코드처럼 호출 URL을 WebClient 객체를 build하기 전 baseUrl로 설정해주는 방식도 존재하지만, UriBuilder의 sheme(), host() 메소드를 사용해서 지정할 수도 있다. 하지만 이렇게 하게 되면 URL을 설정하는 코드가 중복되기 때문에 하나의 메소드로 분리하여 구현하였다.
UriBuilder를 사용하여 URL을 지정하는 방법은 아래와 같다.
this.setBaseUrl(baseUrl)
                .post()
                .uri(uriBuilder -> uriBuilder
                        .scheme("https")
                        .host("example.com")
                        .queryParams(params)
                        .build())
                .bodyValue(requestBody);
ConnectStepImpl
@Slf4j
@RequiredArgsConstructor
public class ConnectStepImpl implements ConnectStep {

    private final WebClient.RequestHeadersSpec<?> methodType;
    private Object response;


    /**
     * WebClient의 header와 response class 설정 후 block으로 호출<br>
     * 헤더와 응답값이 존재할 때 사용. (ex. 일반적인 api 호출)<br>
     * 예외처리 포함
     *
     * @return {@link ResponseStep}
     */
    @Override
    public ResponseStep connectBlock(Map<String, String> headers, Class<?> responseType) {
        try {
            this.response = this.methodType
                    .headers(httpHeaders -> {
                        httpHeaders.setAll(headers == null || headers.isEmpty() ? new HashMap<>() : headers);
                    })
                    .retrieve()
                    .onStatus(HttpStatus::isError, clientResponse ->
                            clientResponse.bodyToMono(String.class)
                                    .flatMap(msg -> Mono.error(new APIException(ResponseCode.INTERFACE_ERROR, msg))))
                    .bodyToMono(responseType)
                    .retryWhen(Retry.fixedDelay(3, java.time.Duration.ofSeconds(1))
                            .doBeforeRetry(before -> log.info("Retry: {} | {}", before.totalRetries(), before.failure())))
                    .block();
            return new ResponseStepImpl(this.response);
        } catch (Exception e) {
            log.error("Exception : {}", e.getMessage());
            throw new ApiException(ErrorCode.INTERFACE_ERROR, e.getMessage());
        }
    }


    @Override
    public ResponseStep connectBlock(Map<String, String> headers) {
        try {
            this.response = this.methodType
                    .headers(httpHeaders -> {
                        httpHeaders.setAll(headers == null || headers.isEmpty() ? new HashMap<>() : headers);
                    })
                    .retrieve()
                    .onStatus(HttpStatus::isError, clientResponse ->
                            clientResponse.bodyToMono(String.class)
                                    .flatMap(msg -> Mono.error(new APIException(ResponseCode.INTERFACE_ERROR, msg))))
                    .bodyToMono(Object.class)
                    .retryWhen(Retry.fixedDelay(3, java.time.Duration.ofSeconds(1))
                            .doBeforeRetry(before -> log.info("Retry: {} | {}", before.totalRetries(), before.failure())))
                    .block();
            return new ResponseStepImpl(this.response);
        } catch (Exception e) {
            log.error("Exception : {} | {}", e.getMessage(), e.getStackTrace()[0].toString());
            throw new ApiException(ErrorCode.INTERFACE_ERROR, e.getMessage());
        }
    }


    /**
     * WebClient의 header와 response class 설정 후 block으로 호출<br>
     * 헤더와 응답값이 존재하지 않을 때 사용. (ex. Google chat webhook api 호출)<br>
     * 예외처리 포함
     *
     * @return {@link ResponseStep}
     */
    @Override
    public ResponseStep connectBlock() {
        try {
            this.response = this.methodType
                    .retrieve()
                    .onStatus(HttpStatus::isError, clientResponse ->
                            clientResponse.bodyToMono(String.class)
                                    .flatMap(msg -> Mono.error(new APIException(ResponseCode.INTERFACE_ERROR, msg))))
                    .bodyToMono(Object.class)
                    .retryWhen(Retry.fixedDelay(3, java.time.Duration.ofSeconds(1))
                            .doBeforeRetry(before -> log.info("Retry: {} | {}", before.totalRetries(), before.failure())))
                    .block();
            return new ResponseStepImpl(this.response);
        } catch (Exception e) {
            log.error("Exception : {} | {}", e.getMessage(), e.getStackTrace()[0].toString());
            throw new ApiException(ErrorCode.INTERFACE_ERROR, e.getMessage());
        }
    }
}
ConnectStep은 본격적으로 API를 URL로 호출하여 응답을 받는 부분이다.
이번에도 각 메소드를 하나씩 살펴보자
- retrieve() : WebClient에서 응답을 받는 방식은
exchange()와retrieve()두가지가 있다.exchange()는 deprecated되었으므로 만약 exchange를 사용하고 싶다면exchangeToMono()나exchangeToFlux()를 사용하자. - onStatue() : 상태코드를 캐치한다. 특정 상태코드 (404, 500 등등)나 4xx, 5xx 등 세분화하여 응답을 받을 수 있다.
- 여기서는
isError를 사용하여 모든 에러를 캐치하여 Exception을 throw할 수 있도록 구현하였다.
- 여기서는
- bodyToMono() : ResponseBody를 원하는 객체로 변환한다. Mono 타입이므로 0 ~ 1개의 응답만 받을 수 있다.
- 만약 2개 이상의 응답을 받고 싶다면
bodyToFlux()를, ResponseEntity를 받고 싶다면toEntity()를 사용할 수 있다.
- 만약 2개 이상의 응답을 받고 싶다면
- retryWhen() : 에러가 발생했을 경우 재시도 한다. Retry 객체로 재시도 횟수와 대기 시간, 재시도하기 전에 수행할 동작을 정의할 수 있다.
- block() : 응답을 동기 방식으로 받는다. block를 사용하면 비동기 타입인 Mono<Object>가 아닌 Object 객체를 가져올 수 있지만 WebClient의 장점인 비동기 방식이 아닌 동기 방식을 사용한다는 부분에 유의하자.
- 내 경우에는 비동기 통신을 이용할 일이 없기 때문에 모든 메소드를
block()을 사용하여 동기 방식을 사용하였다. 이 역시 개인의 요구사항에 맞춰 사용하자.
- 내 경우에는 비동기 통신을 이용할 일이 없기 때문에 모든 메소드를
코드를 살펴보면 오버로딩을 통해 여러가지 파라미터를 받는 걸 확인할 수 있다. 이는, 요청으로 header가 필요한 경우, 특정 응답 객체로 받는 경우, 아무 응답도 받지 않는 경우를 모두 구현해 놓았기 때문이다.
이렇게 API 호출 및 응답을 받는 과정을 마치면 최종적으로 객체를 원하는 형태로 만드는 ResponseStepImpl을 리턴하여 최종 단계로 넘어갈 수 있다.
ResponseStepImpl
@Slf4j
@RequiredArgsConstructor
public class ResponseStepImpl implements ResponseStep {

    private final Object response;

    /**
     * WebClient의 response를 Object로 리턴<br>
     * 응답값을 response type class로 파싱 후 사용<br>
     * <br>
     * Example)<br>
     * TestDto test = (TestDto) webClientConnectorTest.post(url, path, requestBody)
     *                 .connectBlock(headers, TestDto.class)
     *                 .toObjectCall();
     * @return {@link Object}
     */
    @Override
    public Object toObjectCall() {
        return this.response;
    }

    /**
     * WebClient의 response를 JsonNode로 파싱하여 리턴
     * @return {@link JsonNode}
     */
    @Override
    public JsonNode toJsonNodeCall() {
        try {
            ObjectMapper om = new ObjectMapper();

            return om.readTree(this.response.toString());
        } catch (JsonProcessingException e) {
            log.error("JsonProcessingException : {}", e.getMessage());
            throw new ApiException(ErrorCode.INTERFACE_ERROR, e.getMessage());
        }
    }

    /**
     * WebClient의 response를 리턴하지 않음
     */
    @Override
    public void toVoidCall() {}
}
마지막 step은 간단하다. 어떤 형태의 객체를 return할 지를 결정하는 부분이다.
사실 toJsonNodeCall()은 굳이 필요하지 않지만 팀원의 요청으로 넣어두었기 때문에 무시해도 된다.
크게 설명할 부분이 없으므로 이 부분은 코드만 보여주고 넘어가도록 하겠다.
Result
이 모든 과정을 마치면 이전 글에서 작성한 것처럼 아래와 같이 코드를 사용할 수 있다.
public Object callApi(String baseUrl, String path, T request, Class<?> response) {
    return apiWebClientBuilder.request()
            .post(baseUrl, path, request)
            .connectBlock(this.getHeader(), response)
            .toObjectCall();
}

public ExampleResponseDto exampleCallApi(ExampleRequestDto request) {
	String baseUrl = "https://example.com";
    String path = "/api/test";

    return (ExampleResponseDto) this.callApi(baseUrl, path, request, ExampleResponseDto.class);
}
최종 코드는 아래 Github 링크에서 확인할 수 있다
https://github.com/Anna-Jin/spring-boot
GitHub - Anna-Jin/spring-boot: spring boot 코드 정리 및 공부용 레파지토리
spring boot 코드 정리 및 공부용 레파지토리. Contribute to Anna-Jin/spring-boot development by creating an account on GitHub.
github.com
마치며
어떻게 WebClient를 더 쉽게 라이브러리처럼 bean등록하여 사용할 수 있을까 고심하여 코드를 짜보았다.
긴 내용이지만 WebClient에 대한 약간의 이해가 있는 상태에서 차근차근 따라가면 크게 어려울 것 없는 코드라고 생각한다.
아직 초보 개발자로서 완벽한 코드라고 말하기는 어렵지만, 계속 코드를 업데이트하면서 더 완벽하게 만들어 모듈화시킬 예정이다!
'Spring boot' 카테고리의 다른 글
| [Spring boot] WebClient 사용해보기 - 비동기 통신 subscribe() (0) | 2023.11.11 |
|---|---|
| [Spring boot] SSH 터널링 구현하기 (0) | 2023.10.13 |
| [Spring boot] WebClient 사용해보기 - 모듈화 1-1 (0) | 2023.08.25 |
| [JPA] 프록시(Proxy), 지연 로딩(LAZY Loading), 즉시 로딩(EAGER Loading) (0) | 2022.06.23 |
| [JPA] 영속성 관리 (0) | 2022.06.21 |